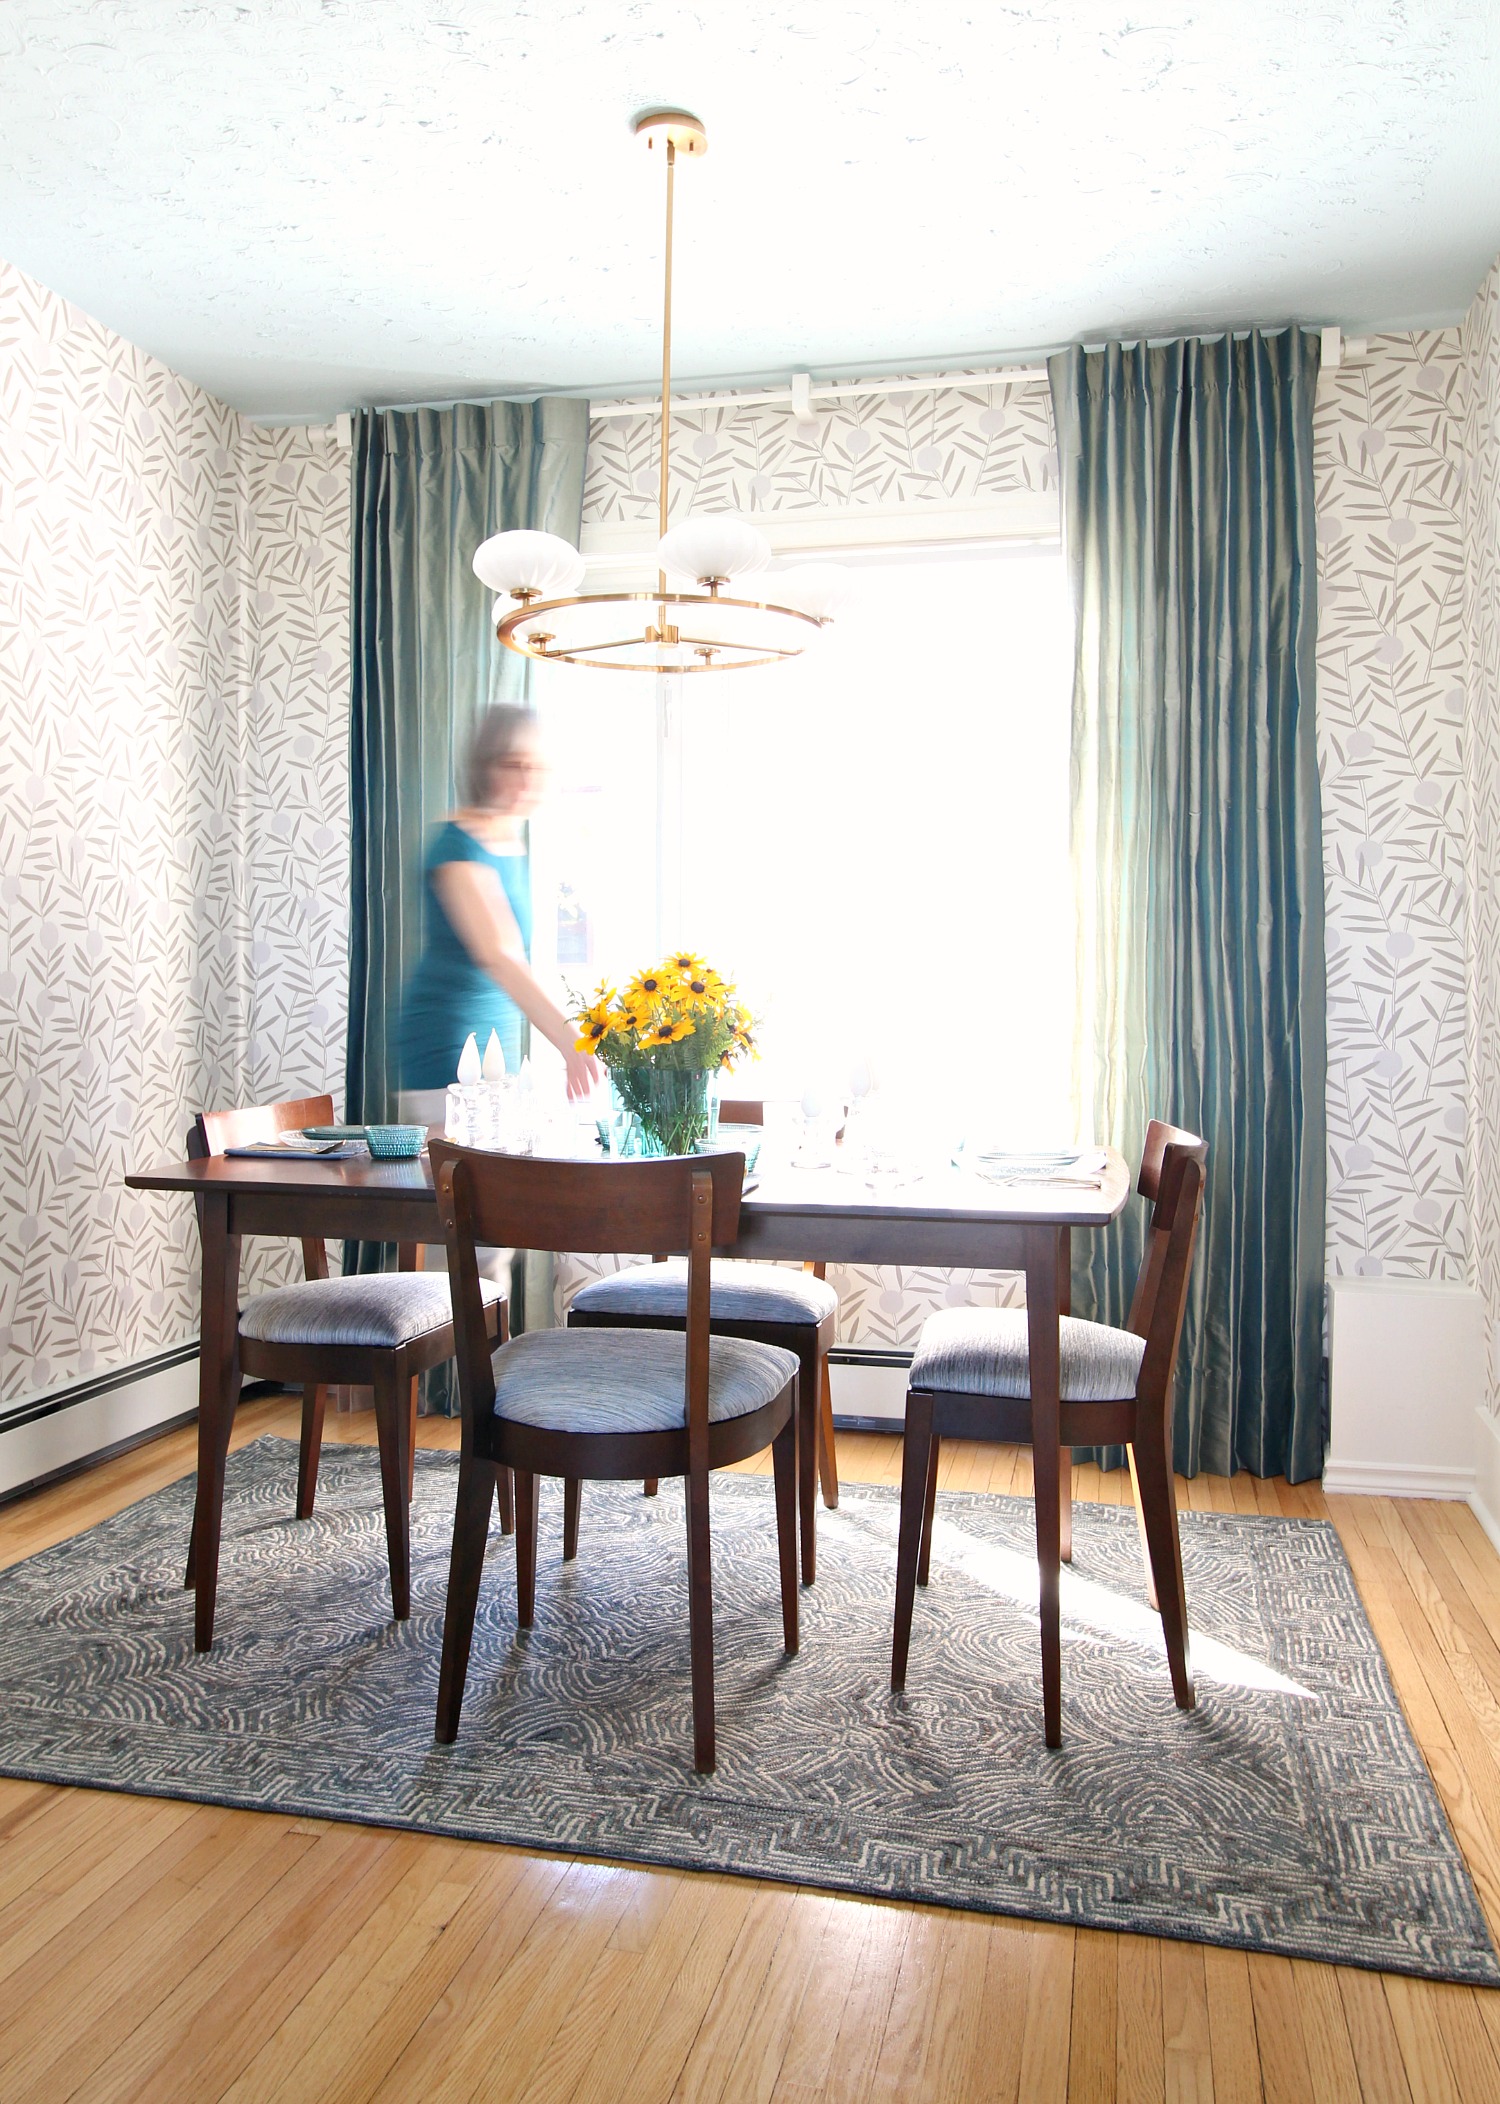
I’m going to show you how to make back tab curtains today and I’m so excited to show you the DIY silk drapes we made for my Mom’s vintage inspired dining room makeover. The dining room is small and we chose a soft, neutral wallpaper so I envisioned making silk curtains in a rich color to lend depth and interest to this small space. Luckily Mom’s apartment has large windows, so it was a lovely feature to highlight! Online Fabric Store generously provided the fabric of my choice and today I’m going to show you how we sewed these DIY silk curtains with back tabs.

Is Silk a Good Fabric for Curtains?
Silk fabric is a luxurious choice for curtains but there’s one caveat: it’s a delicate fabric! Sun can break down the fibers and destroy silk curtains. Silk can also be damaged by moisture and requires gentle laundering (sometimes dry clean only). So, is silk a good fabric for curtains? Yes – if your window does NOT get a lot of direct sunlight/moisture, or you line the silk curtains with another fabric, or you accept that the sun will eventually breakdown the material. Even constant handling can damage silk curtains. Silk drapes won’t tolerate greasy fingers like other, more durable curtain fabrics. But we chose to overlook these limitations because my Mom and I are both obsessed with the glorious sheen of silk!! Before I show you how to sew back tab drapes, can we take a moment to appreciate just how perfectly this silk fabric coordinates with the new rug? I picked everything out for my Mom’s dining room makeover online and I was delighted when the color was a perfect match in real life! The photos on the Online Fabric Store website were really true to life and made it easy to pick a complementary drapery fabric (this is the “Premium Spa Silk Shantung Fabric“).

The silk fabric with the patterned wool rug is a perfect match!!

Silk Curtains on Curtain Rings:
My mom and I have made DIY silk curtains before. I have long loved the look of silk drapes and had them in my office, way back in the townhouse, but we didn’t do anything fancy then. We just hemmed panels of silk fabric and used curtain rings with clips (see below). It was a simple way to make affordable curtains, but didn’t do much to highlight the silk. I tried to adjust the rings and sort of “floof” the top of the curtains to encourage a nice gather and drape, but ultimately this easy DIY curtain idea was a bit of flop because the curtains just never sat right. They always looked a little sloppy. But gosh, silk is beautiful. I was excited to try DIY silk curtains again, but with a more polished approach.

Silk curtain panels on curtain rings just don’t drape elegantly!
Are Back Tab Curtains Good?
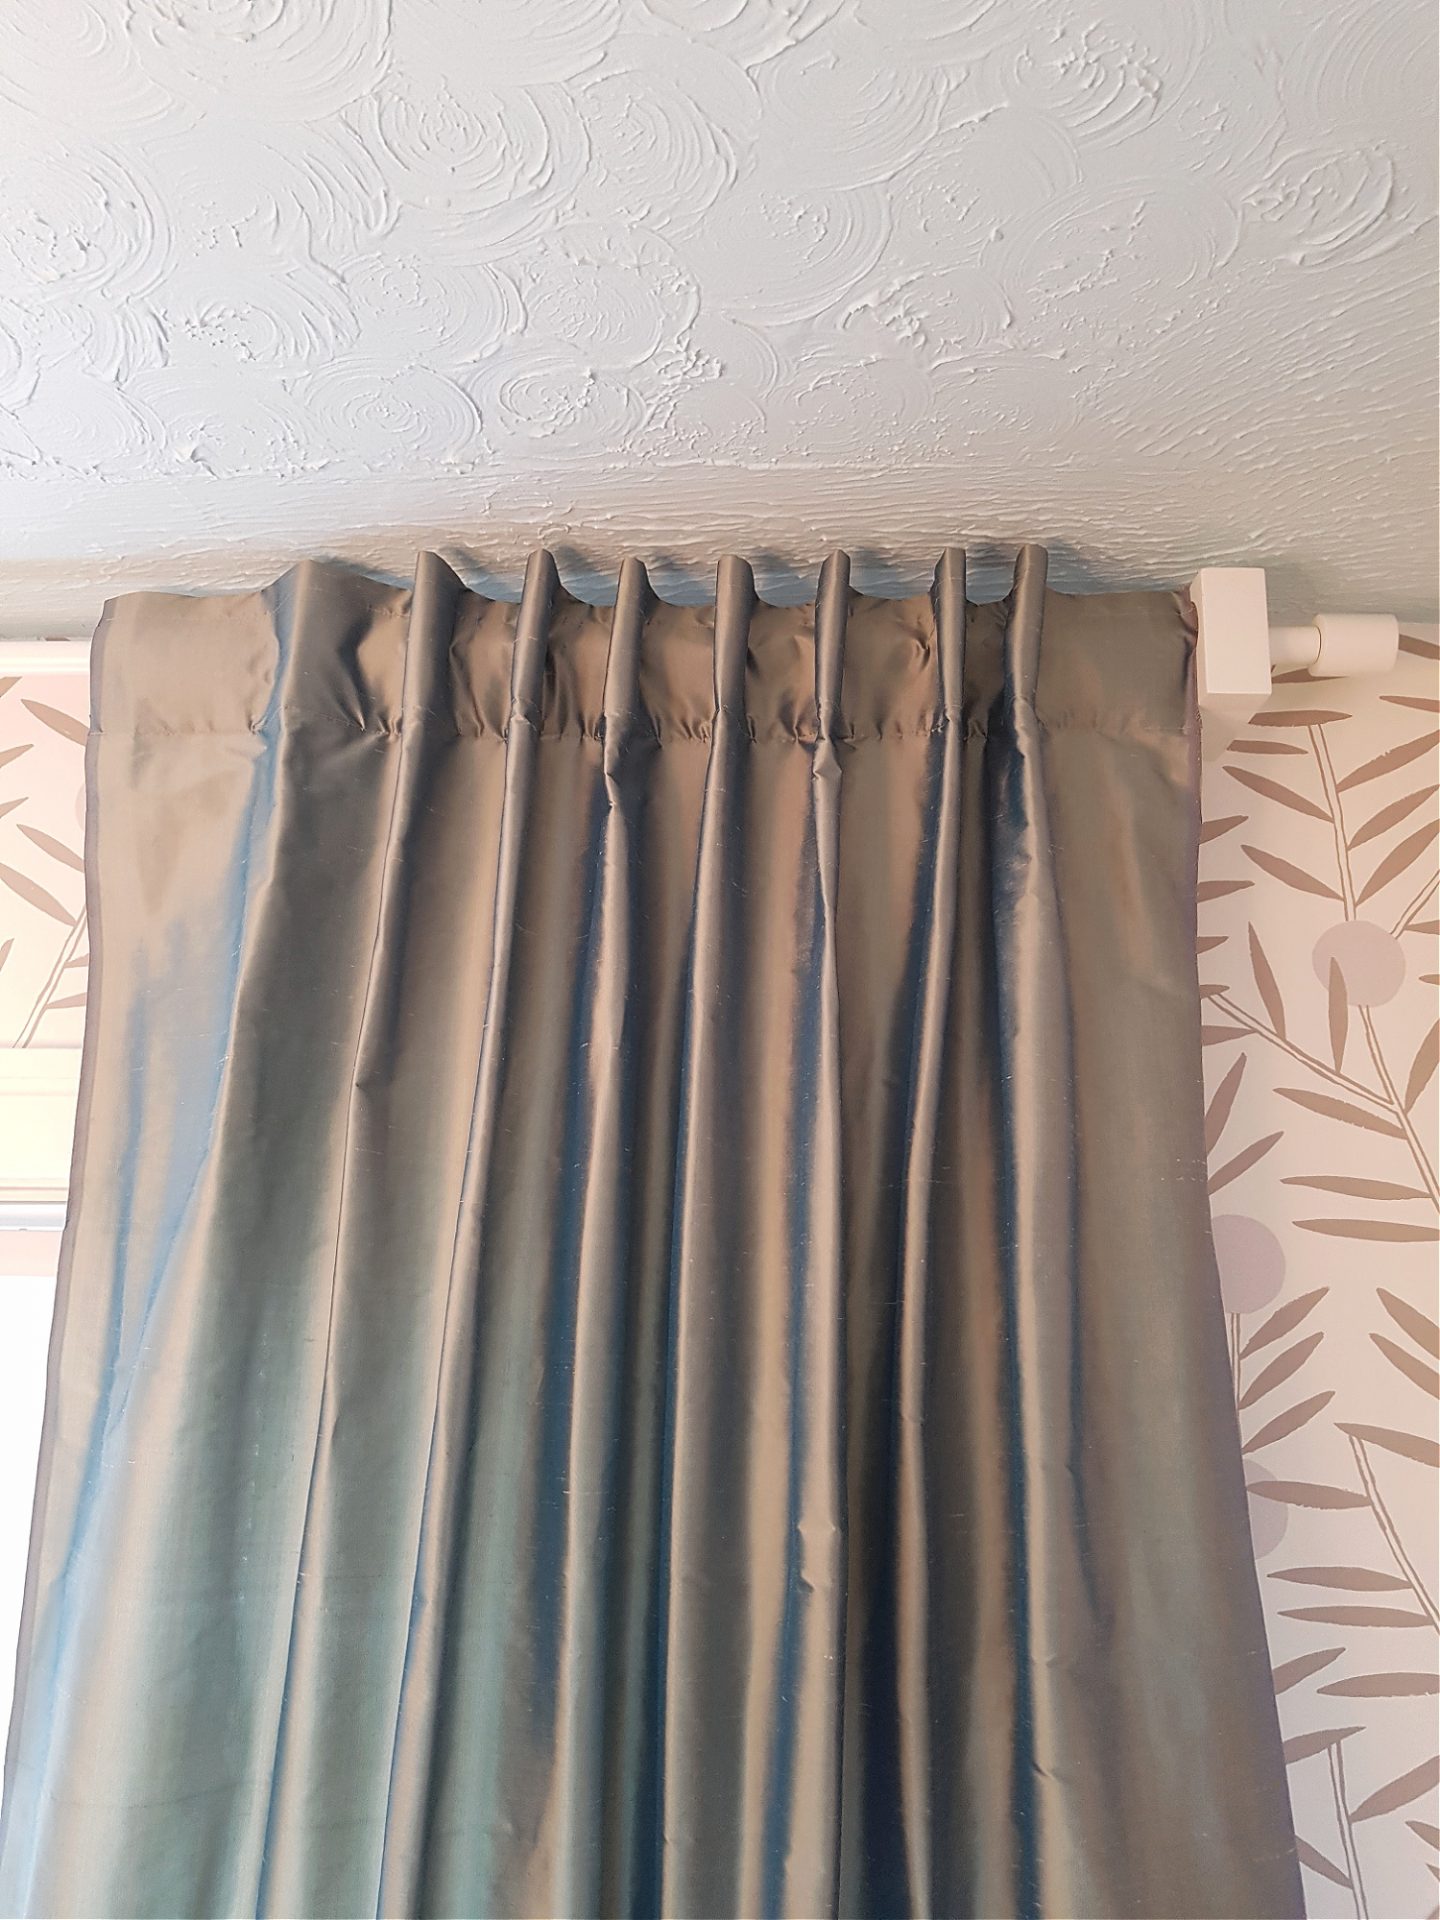
Back tab curtains are good for any space – they can look elegant or casual, depending on the fabric choice and also the size and spacing of tabs, as you’ll see. Back tab curtains are deceptively easy to sew but always look good. My Mom and I have gotten a little fancier since the townhouse DIY curtains sewing days where we relied heavily on curtain rings. Now we use drapery hooks, make back tabs, and do drapery pleating. But back tab curtains are still one our favorite ways to make DIY curtains. One of the reasons we started using the back tab method for making DIY curtains is that when I first bought my white curtain rods, I could never find curtain rings to match. The solution: back tabs! No curtain rings needed. You’ve seen my DIY back tab curtains using these white curtain rods and also the updated green tweed back tab drapes in the bedroom and coordinating aqua tweed back tab drapes (and white curtain rods) in the office. I gave my Mom my white curtain rods because we could not longer use them after we had the windows enlarged. I was so happy she could re-purpose them but we were still unable to find matching curtain rings. So for these DIY silk drapes we opted for the back tab method again – but with some adjustments to help the silk fabric drape well. Here is our updated back tab curtain tutorial for making DIY silk curtains.
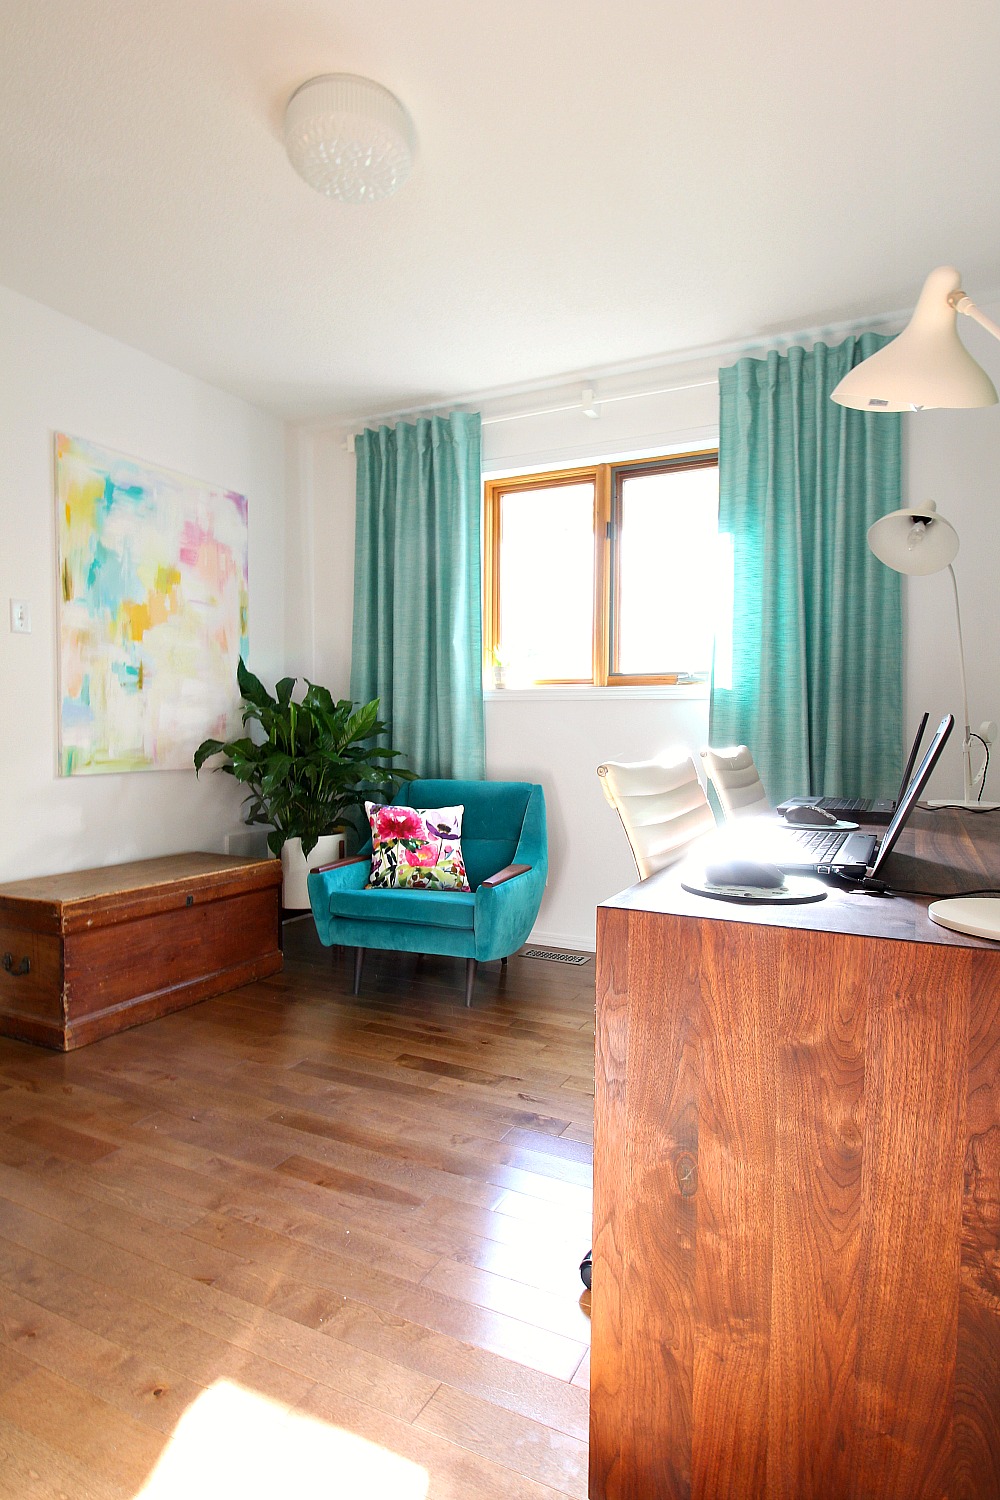
Back tab tweed curtains in my home office
Supplies for Sewing Back Tab Curtains:
- Drapery fabric of your choice
- Fabric for tabs (can be leftover drapery fabric)
- Coordinating thread
- Olfa self healing mat
- Olfa rotary cutter
- Metal straight edge
- Soft tape measure
- Stiffener/header tape/drapery tape
- Tailor’s chalk pencil
- Straight pins
- Pin curl clips (optional)
- Sewing machine
- Iron
- Ironing board
How to Measure for Tab Curtains:
I will provide the measurements for these silk DIY hidden tabs curtains and also the original patterned hidden tabs curtains we made for my bedroom. We used the same curtain rod and the fabric panels were approximately the same. However, the fabric was very different and you’ll see that we used fewer, wider tabs for the heavier fabric and more thinner tabs for the lighter weight silk. However, both curtains have very similar measurements which should help you figure out how to measure for tab curtains. For reference, 6″ between tabs is typically recommended as the distance between back tabs. You’ll likely want your tabs 1-2″ wide. For my patterned handmade back tab curtains, each of my curtain panels was approximately 53″ wide. We did a total of 7 tabs per panel and each tab was 2″ wide. You’ll see that for these silk curtains, we preferred the look of 1″ tabs. In both cases, the curtain rod has an overall length of 8 feet. You can adjust the distance between back tabs: more tabs will create a fuller, more pleated look.

How Wide Should Tabs on Back Tab Curtains Be?
Before cutting out the tabs, determine how many tabs you would like and how wide you would like them to be. The width of the tabs will determine how the finished drapes gather. This silk has a lovely weight and crispness, which lends itself to narrower tabs. When sewing custom drapes, it is okay if there is a little trial and error involved to get the “perfect” look you want. The first set of tabs we cut out and sewed together were a little too wide and thus created sharper pleating than we wanted. We were aiming for a softer drape. You can see the the first attempt here (wider tabs = sharper pleats):
Wider Tabs = Sharper Pleats (we think these tabs were too wide)
We ended up redoing the tabs at half the width, so the new tabs are 1″ wide and approximately 4″ long (with 1/2″ tucked under the seam), which is why in the tutorial photos you might spot the width of the tabs changing. You can see in the photo below, that narrow tabs made the pleats less sharp and the overall look more relaxed. In the hidden tab curtain tutorial for the patterned drapes shown above, our tabs were 2″ thick.

New tab measurements: 1″ wide + approximately 4″ long (with 1/2″ tucked under the seam)
How Far Apart Should Tabs Be on Back Tab Curtains?
Tabs on back tab curtains are typically 6″ apart, but these measurements can vary a little. The distance between tabs will depend on the softness of pleat you prefer and also the thickness/sturdiness of your fabric. For example, if you fabric is very soft/thin, you may want to tabs closer together to lend structure. But a 6″ distance between tabs is a good starting point. For reference, on the silk curtains panels these are the the back tab curtain measurements:
- Finished tabs are 1″ wide x 4″ long
- Each curtain panel is 54″ wide
- We used 9 of tabs for each curtain panel
- The tabs were sewn approximately 5 5/8″ apart

How to Make Fabric Back Tabs for Curtains – in a Nutshell:
Back tab curtains have little loops on the back of each drapery panel for the curtain rod to slide through. These loops can be made from the same fabric as the curtains. This time we decided to use a piece of white curtain lining fabric with a similar weight and stiffness as the silk. You can also use a more rigid fabric, if your drapery fabric of choice requires more structure. I’ve even seen people use ribbon to skip making the tabs. Here are the basic steps for making the fabric loops, but keep reading for more detailed instructions and photos for how to make curtain back tabs:
- Cut out back tab fabric
- Fold it half
- Using a ruler and tailor’s pencil, measure and mark the tabs – including seam allowance
- Method 1: sew along the edges and then cut out each tab
- Method 2: cut out each tab and then sew along the edges
- Turn each sewn “tube” inside out
- Pressing each tab flat with an iron
- Proceed with sewing each tab into the curtain header each curtain panel

How to Measure Fabric for Curtain Back Tabs:
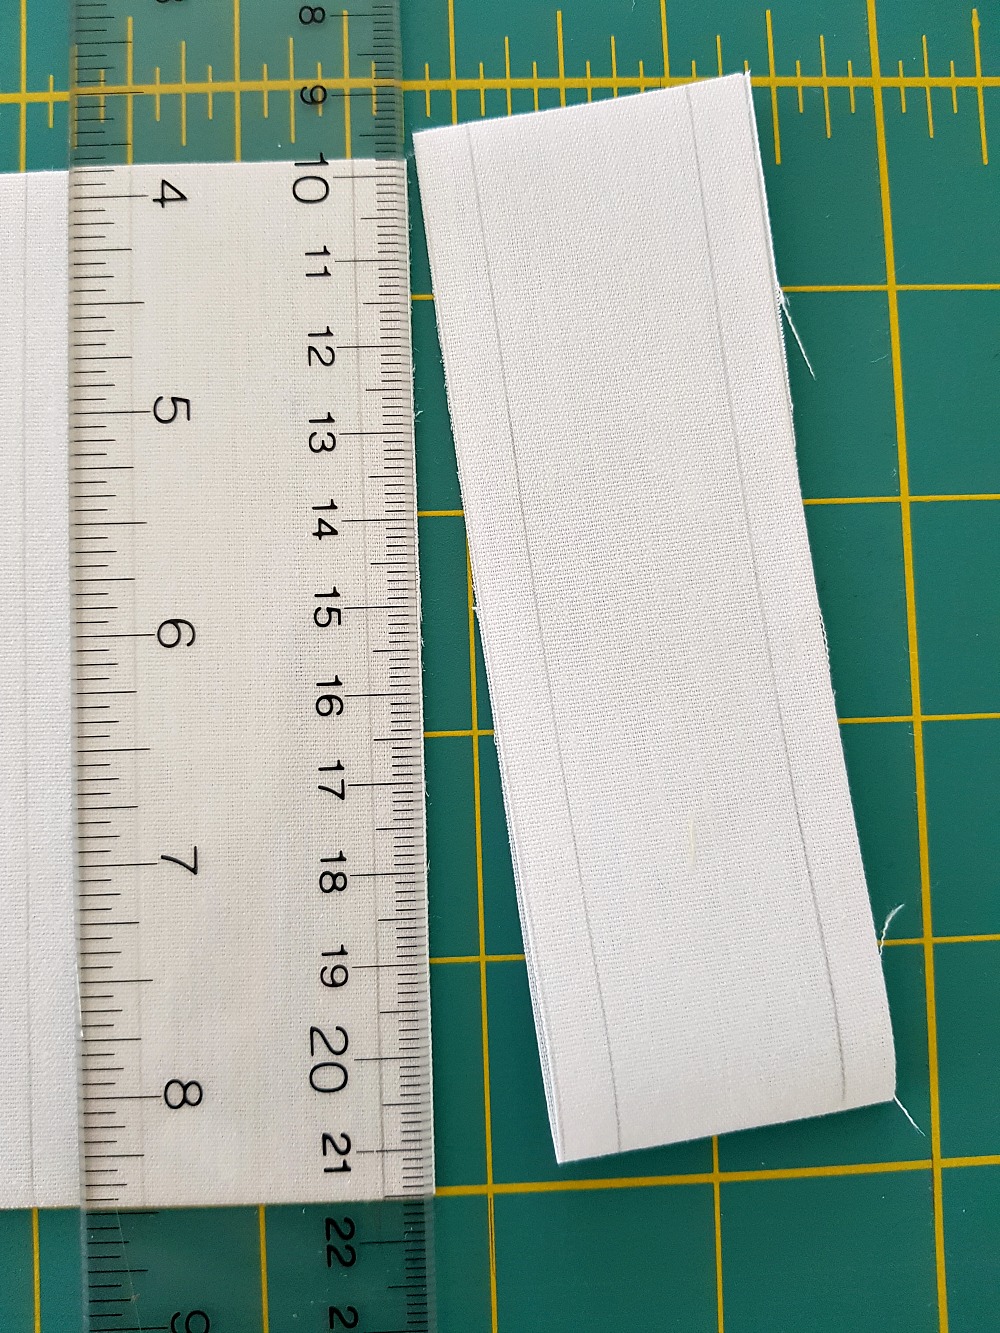
The first step for making hidden tab curtains is to cut out and sew the tabs. How to measure the back tab fabric: in the photo below, you can see that we took cut out our piece of tab fabric 9″ inches wide, and folded it in half. To determine the length of fabric to cut out, we calculated how many tabs we would need and added a seam allowance to each. So we had decided that we wanted 9 tabs per panel, at 1″ wide per tab, with 1/4″ seam allowance added to each side. So in total, we needed a 1.5″ width for each tab – multiplied by 18 tabs in total. Using these numbers, we calculated the length of fabric and cut it out. With the fabric folded in half, we measured and marked for the tabs, remembering to include that 1/4″ seam allowance. The middle line is where to cut, the line on either side is where to sew the sides of each tab:

How to Cut Out + Sew Fabric for Curtain Back Tabs:
There are two ways to cut out and sew the tabs: cut and sew, or sew and cut! For either method, we recommend an Olfa cutter, ruler (a metal straight edge – not plastic like we used, because these Olfa cutters can actually cut the plastic), and self healing Olfa mat. These tools will make it easier to cut straight lines. Here’s the first, slightly more labor intensive way you can do it: cut the tabs out before sewing them, by cutting along the middle of the three lines marked in the first step (the other two lines are the stitching lines). Then stitch the sides of each tab, one at a time. If you choose to do it this way, you will end up with a pile of tabs ready to be sewn along the stitching lines you have marked:

An easier way is to sew the seams first and then cut out the tabs on the line between the seams, like in the photo below. By doing that, instead of cutting out 18 little strips and doing the seams individually, we figured out how big each tab would be and marked the seam allowance (1/4″ allowance). With the tabs marked, we sewed the seams (outside lines) and then cut them out (the middle line).

Either way, you’re going to end up with a little tube that is only open at one end. Once the tabs/tubes are sewn, if you’ve gone with the 1″ width, you’ll find that it is a pretty narrow channel. The next step is to turn each tab inside out, and we found it easier to turn them inside out by pushing with a pencil (eraser end) or knitting needle if you have it (duller end). Press the tabs flat and you are ready to attach them to the top of the curtain panels.

How to Add Back Tabs to Curtains:
Here’s a brief summary of how to sew back tab curtains, but keep reading for the detailed tutorial for how we sewed these DIY silk curtains with back tabs:
- Start to sew the curtain header by sewing the top seam of the curtain
- Pin the raw edge of the tabs onto this finished seam
- Fold the fabric over again to form the curtain header
- Sew down the header, trapping the end of the curtain tabs inside
- Fold back the loops and sew down the loose ends
Detailed Tutorial for Sewing Back Tab Curtains:
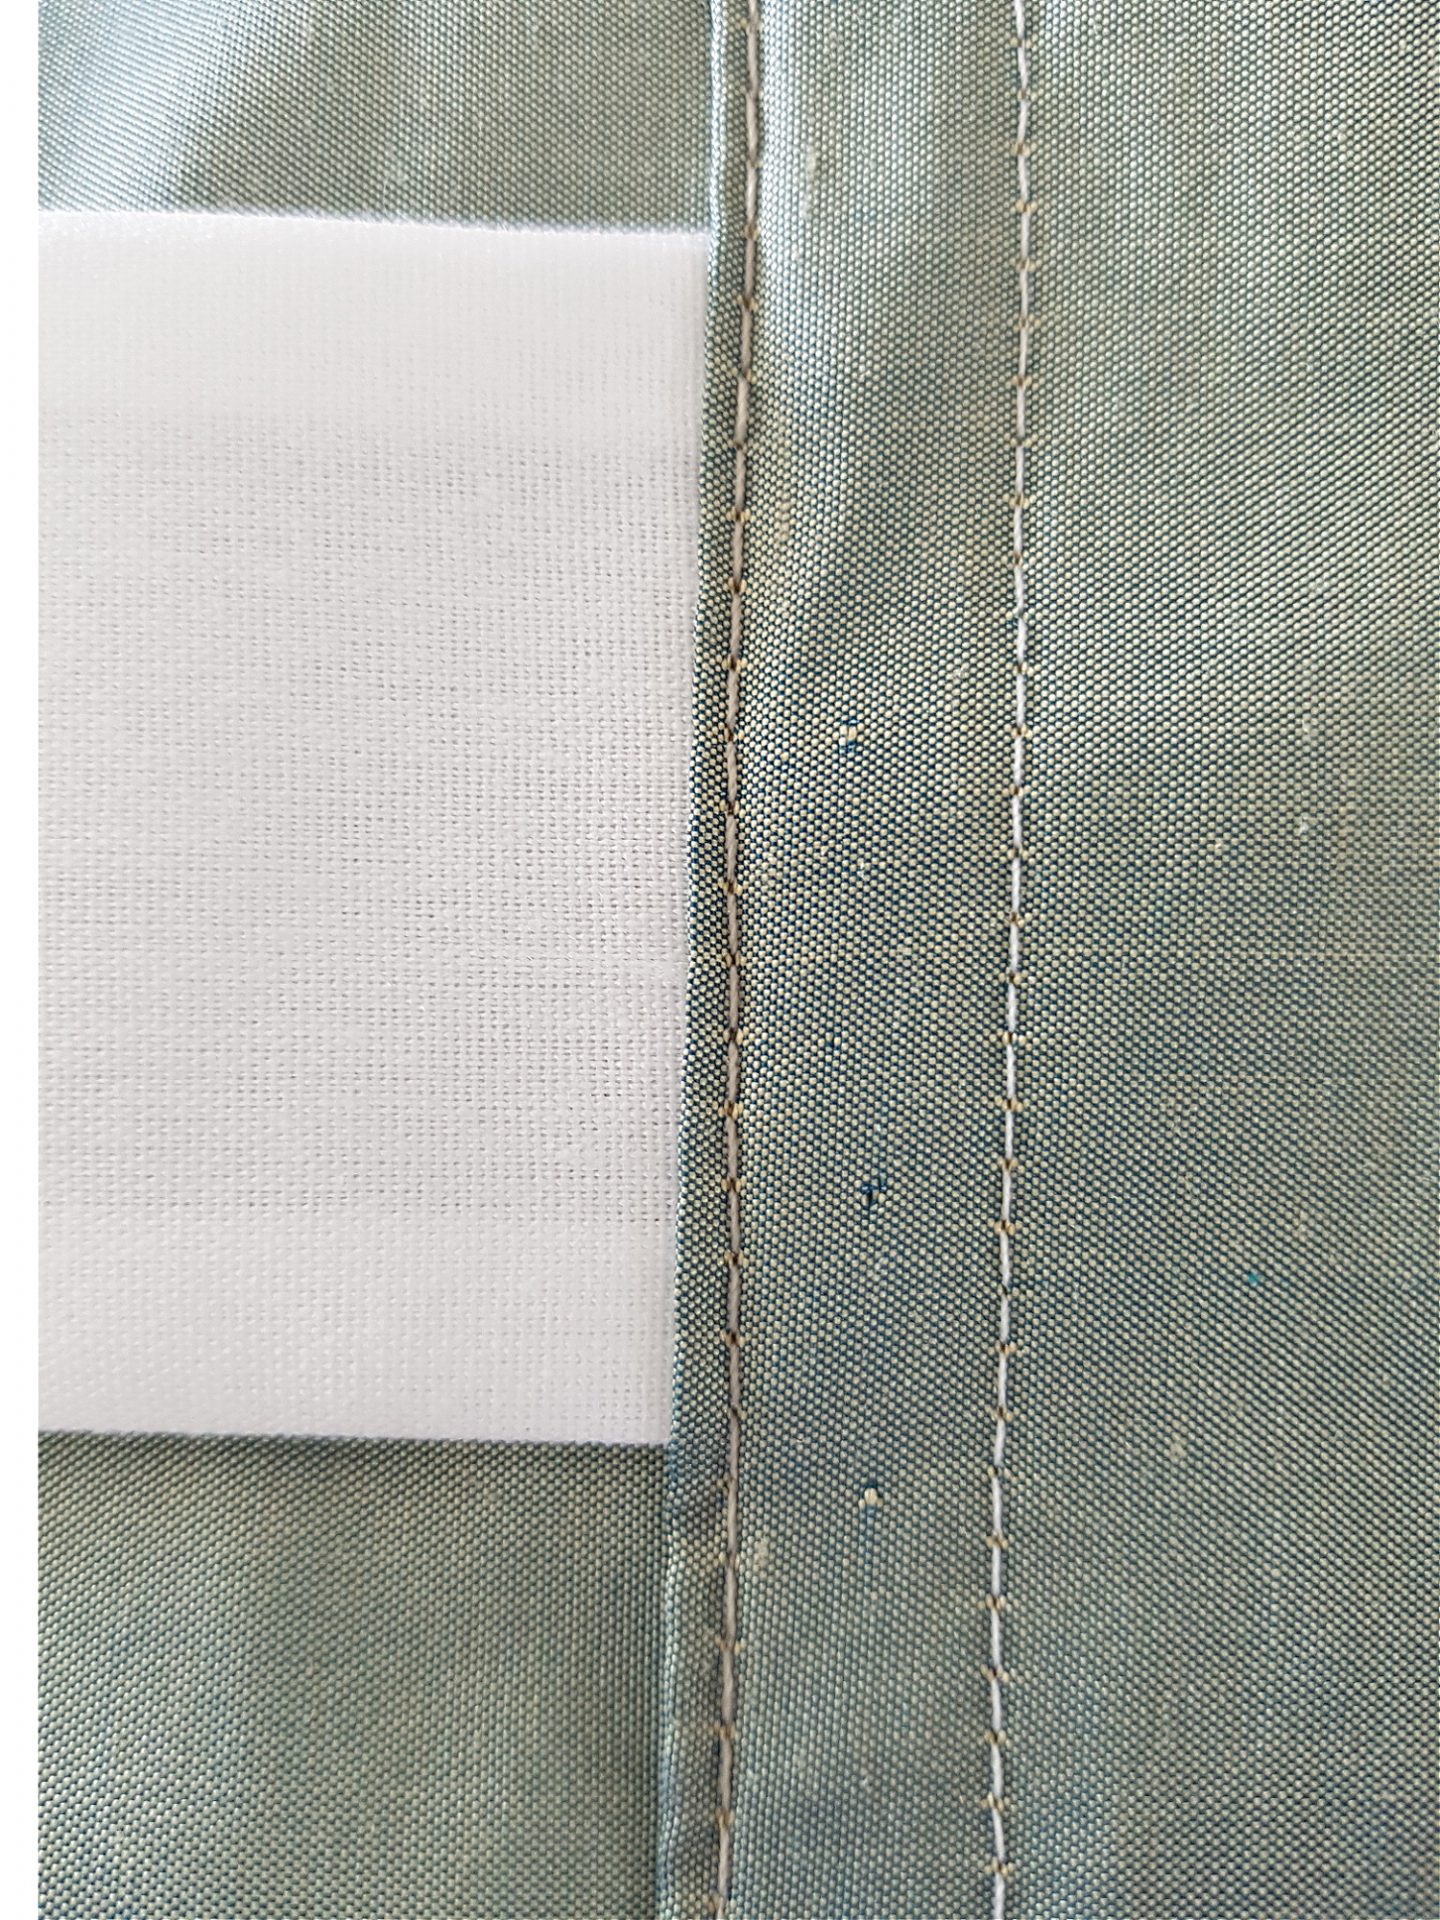
When sewing the curtain panel itself, we used a 4″ wide strip of stiffener/header tape/drapery tape (it might be labelled as any of these) at the top seam. This tape can be purchased at fabric stores and is sold by the metre/yard. Make sure to purchase the type which comes on a roll instead of something pre-measured in a package, as that may be either too soft or have been bent, which will create unwanted folds in your finished DIY curtain panels. Here you can see that we have already attached the stiffener/drapery tape with a 1/2″ seam folded over and sewn along the top (hot tip: we skipped side seams because the fabric was nicely finished on the edges):
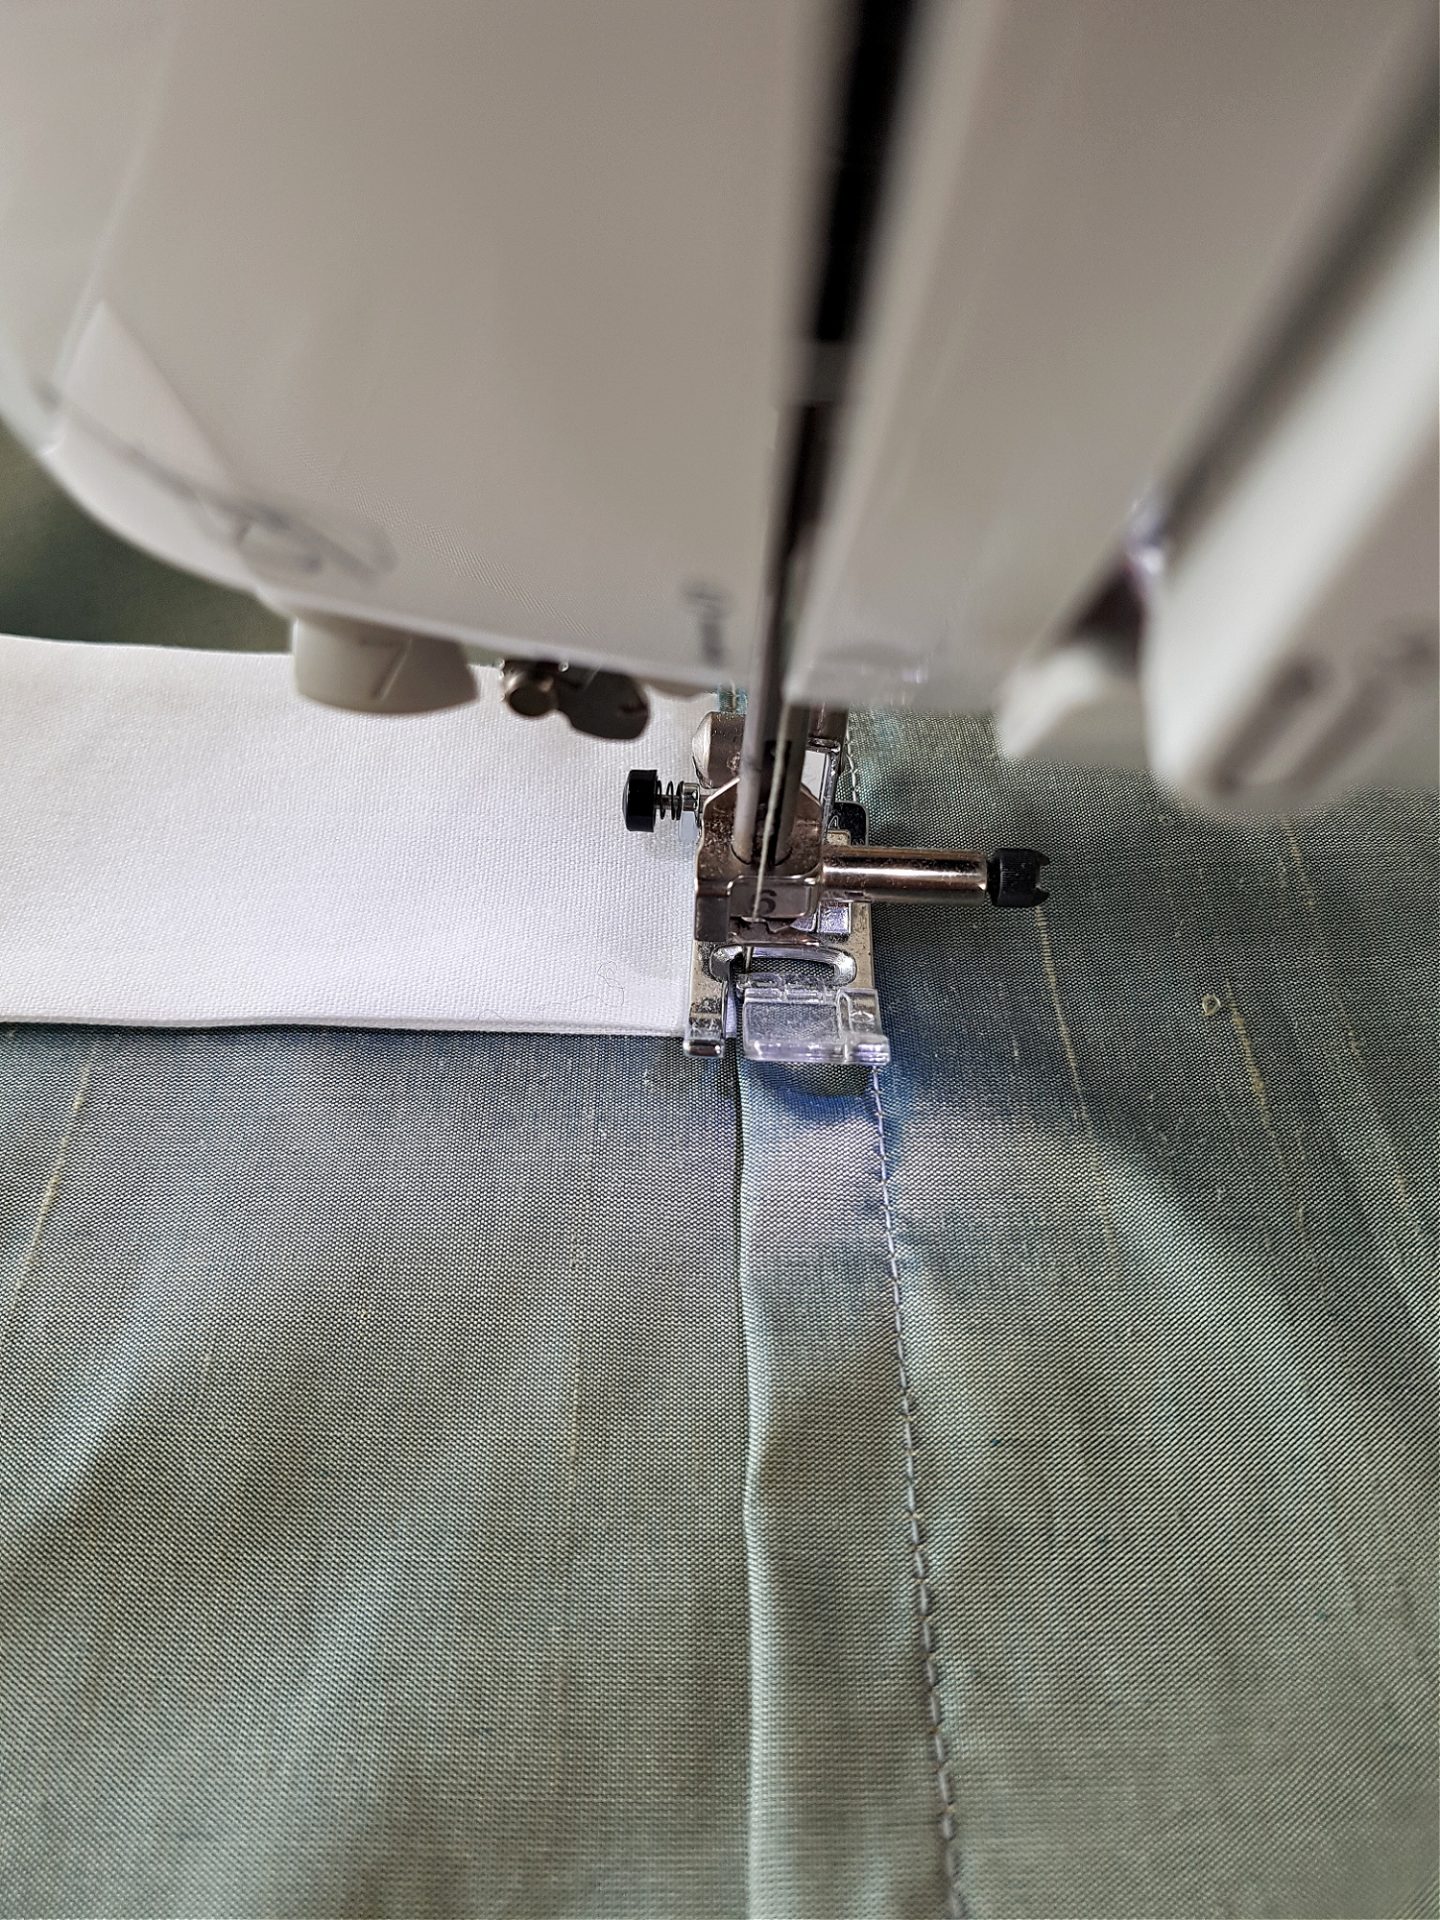
Then pin the back tabs to the top of the curtain. You want 1/2″ of the tabs attached inside the curtain header. Make sure to tuck in the raw edge of the tabs, so it’s hidden when the curtain panel is sewn. Then fold over the section with the stiffener sewn in, like this:
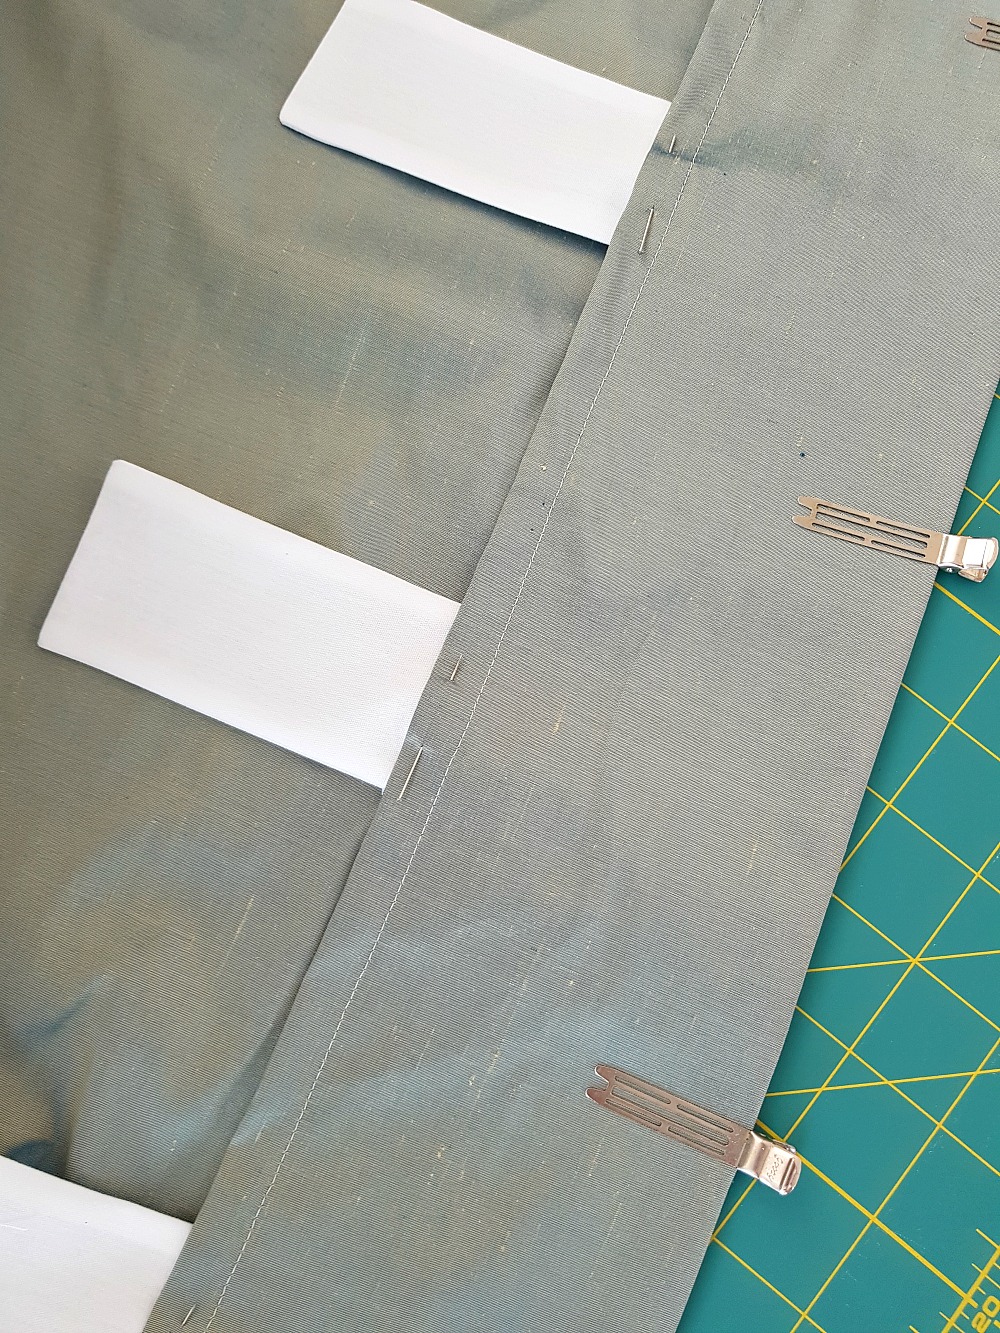
Then sew down that stiffener section, affixing the edge of each tab inside. In the next photo, the lighter row of stitching on the right is where we attached the silk to the stiffener with the 1/2″ seam, and the darker row of stitching on the left is where we attached the tabs to the stiffener/header tape and the actual body of the curtain. Now that it is all sewn down, only one more line of stitching needs to attach the tops of the tabs.
In the next photo, you can see that one end of the tabs is still loose (the finished end), so bend them over, back towards the top of the curtain. We used pin curl hair clips to hold them in place as we tried to avoid putting a lot of pin holes into the silk. The tactile nature of this particular silk is nice to work with as it is not terribly slippery, so the pin curl clips worked well. You can also use straight pins if you prefer.
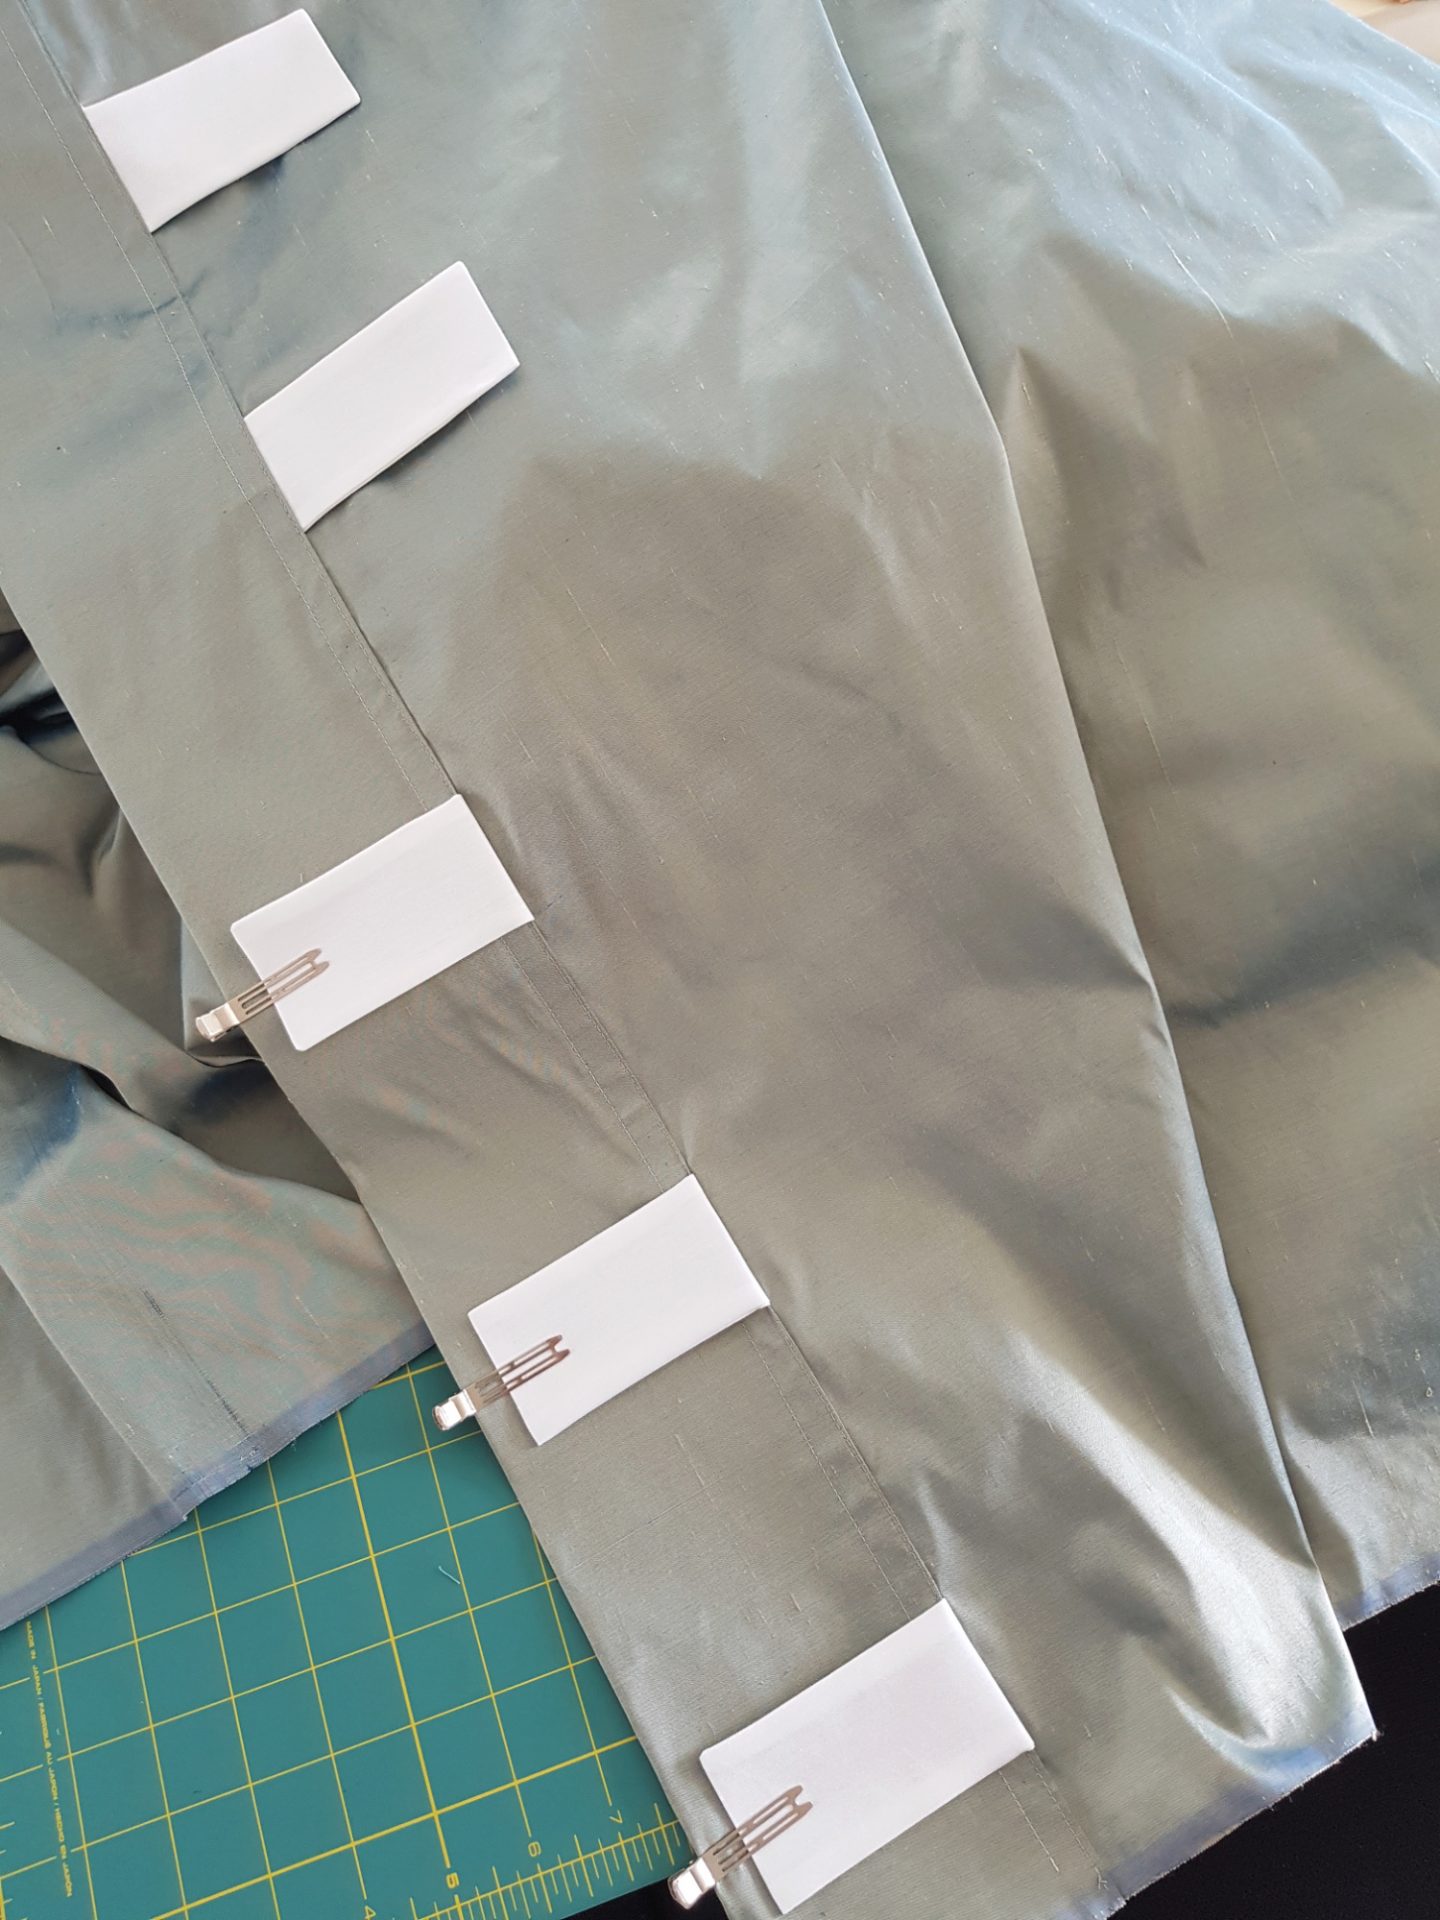
Then sew the remaining side of the tabs down – making sure the top of the tab is inset from the top of the curtain.
How to Make Back Tab Curtains Slide Easily:
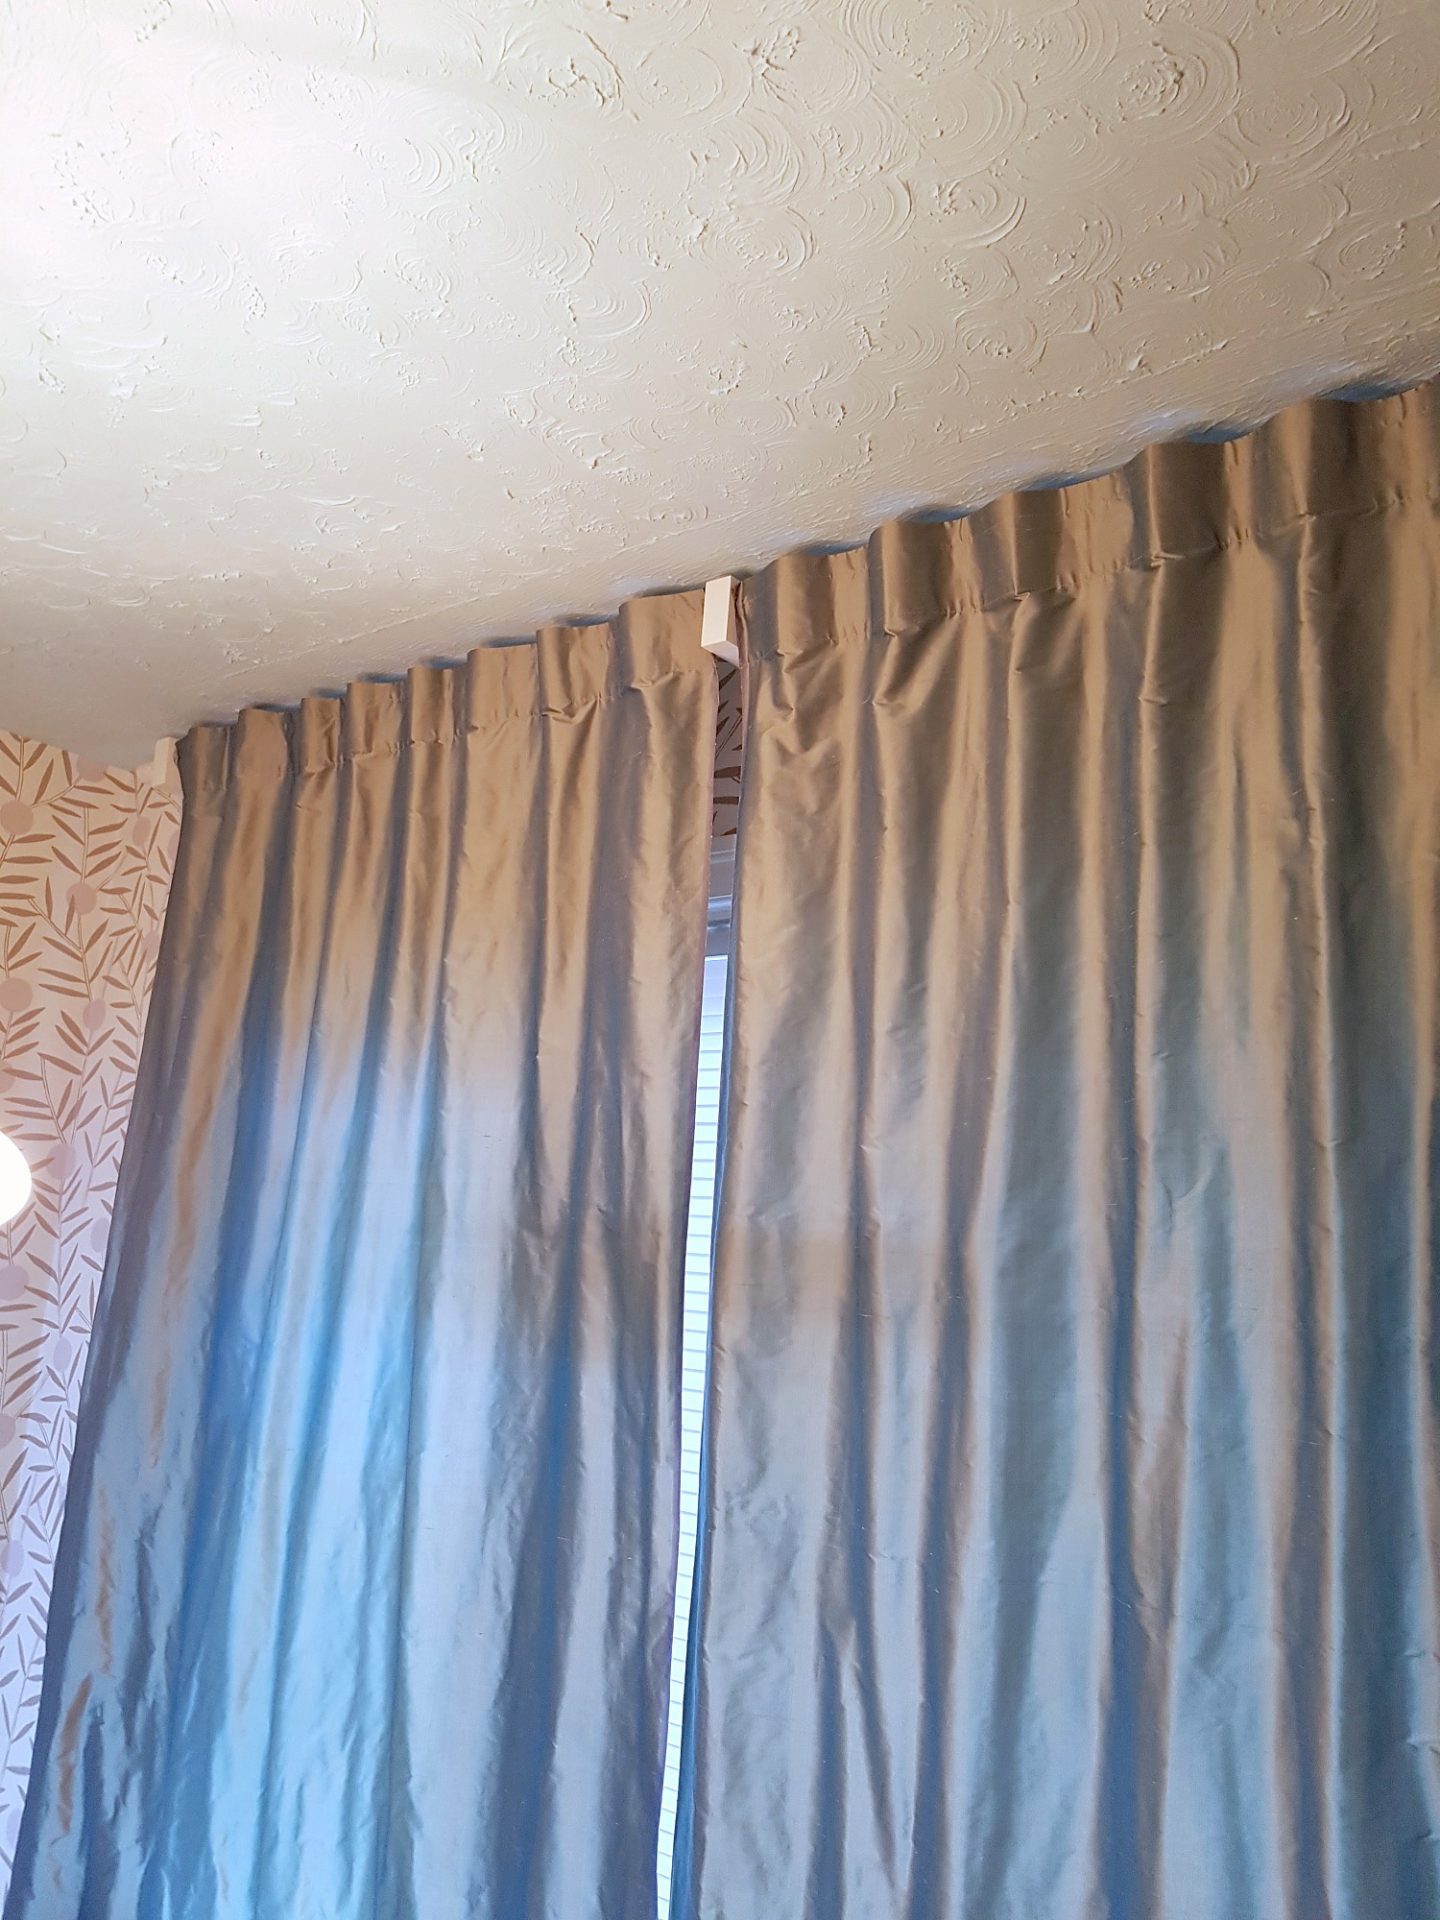
If your back tab curtains don’t slide easily, it may be that the hidden tabs were sewn too tightly. When sewing in the back tabs to your curtain panels, make sure to leave enough of a gap for your curtain rod. The diameter of your curtain rod will determine this so have it on hand to check the spacing of the final stitching for the top of the tab. Your tabs are creating a “pocket” for the rod. If that pocket is too loose, you may end up with a drooping, slightly sloppier look. A loop that is too tight will make it difficult to slide the curtain open and closed.

Our DIY Modern Back Tab Curtains Complete:
The finished hidden tab curtains are easy to slide open and closed. The lighting wasn’t the best, but I did remember to snap a photo of the DIY silk curtains closed! Back tabs make it easy to use curtains because once they’re opened, the tab hold the soft pleating perfectly so there’s no need to fuss with back tab curtains for them to look polished.

These might be the best back tab curtains we have sewn! I love this shimmering teal silk against the neutral wallpaper – it adds some contrast and drama, without competing with the patterned rug or the patterned wallpaper. We chose a simple linen blend fabric for the chair upholstery, which lends another touch of texture in a complementary colorway. I love the organic vibes of this vintage dining room makeover.


Huge thanks to Online Fabric Store for partnering with me on another sewing DIY project! My Mom and I both LOVE how these silk drapes turned out. You can see ALL of our sewing tutorials by clicking here.
More DIY Curtain Tutorials:
- DIY Euro Pleat Curtains (pictured below, with somewhat hidden curtain rings)
- DIY Back Tab Curtains (slightly different method)
- DIY Curtains on a Track (curtain track hidden)
- DIY Gathered Curtains(curtain track exposed)
- DIY Layered Sheers (easy curtain tutorial with curtain rings)
- DIY Basic Shower Curtain with Button Holes
- DIY Ceiling Mounted Shower Curtain with Separate Liner (“drapes” for the shower)
Don’t Forget to Pin for Later!


Well done! They are beautiful draperies and perfect for your mom’s dining room.
Author
Thank you so much!!