Today I’m sharing how to stain wood with water based stain – while also showing you the surface of the DIY desk we’re working on! Yep – Hubby & I have finally put together the desk we have been planning to build since July (check out how we made the DIY welded table legs here). BUT, I have to let the desk surface cure for a week (which is cruel and unusual punishment) before putting anything on it. I’m not planning to be fake and “stage” it for photos, but at least adding the STUNNING lamps I bought would be nice. Picture me hovering near the desk, tightly gripping a lamp, in anticipation. Here is the desk surface, in our gloriously ugly basement, glossy and gorgeous:

Even with the terribly depressing basement lighting, it GLEAMS…

Choosing a Pre-Fab Top for a DIY Desk:
We had planned on building a wood surface, like Hubby did for my vintage treadle sewing machine desk, but while we were at Lowe’s shopping, we stumbled upon this display:

Seriously, look at the sweet price:

One of these pre-fab surfaces was the exact size we needed and it saved us hours and hours and hours of work in our freezing garage. Sold! But it looked at little too knotty for my liking. Hubby is against painted wood (hence the wood-y kitchen we’ve maintained) so, because it is his desk, I opted for a stain instead of paint. But the vision was a whitewashed wood with a GLOSSY finish.
How to Stain Pine Wood with Water Based Stain:
- We lightly sanded the top and edges, because the board was pretty sharp as-is.
- We wiped it clean with a dry cloth.
- Pouring a bit onto foam brush at a time (as per the instructions), we just applied Saman water based stain* and it was fantastic!
*After the fact, I learned that this brand of water based stain can be mixed for custom colors. I opted for “whitewash“.

This stain is really easy to apply and clean up, because it’s water based. UPDATE: I used it on my DIY maple kitchen counters too!

Why Choose a Water Based Stain?
- Water based = easy clean up
- Low odor, making it perfect for indoor projects
- No overlapping marks
- Really awesome coverage
With just one 8 oz. bottle we applied four coats, making the wood almost opaque but still grain-y and wood-y for the Hubs.
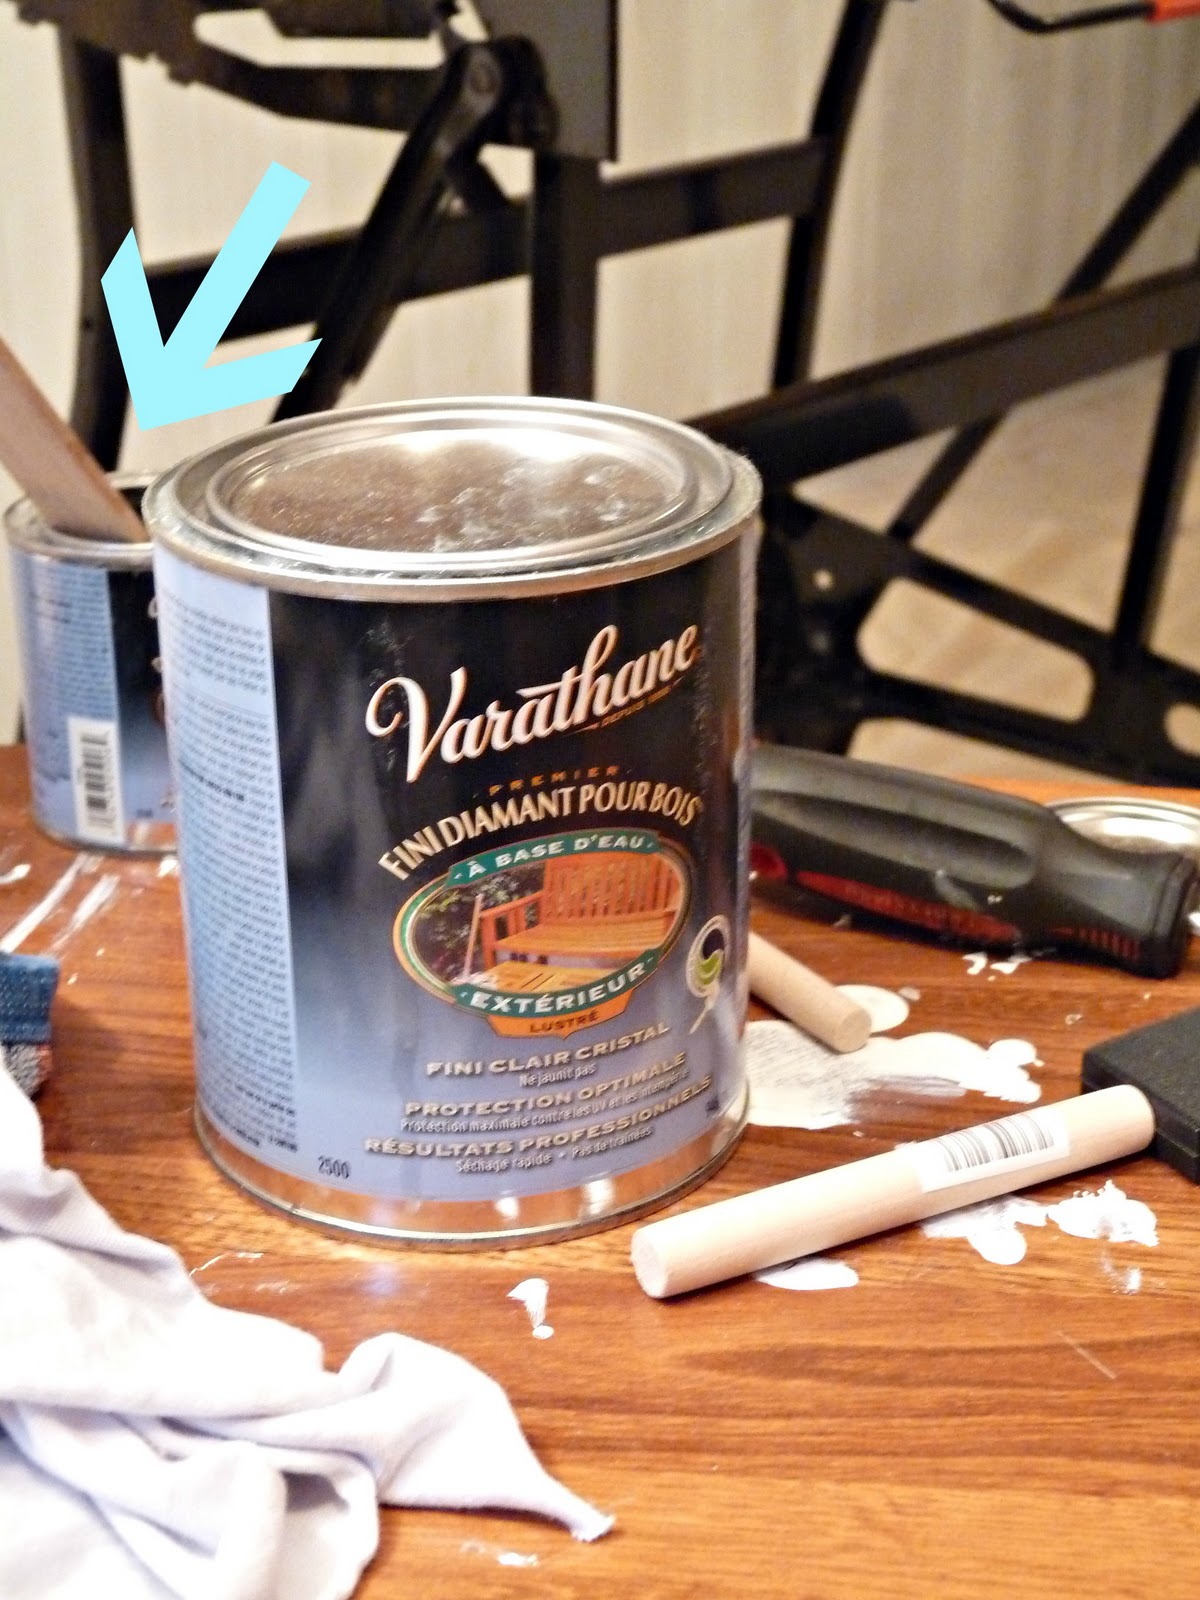
How to Make a Varnished Surface Super Glossy:
We used Varathane brand Premium Diamond Wood Finish in clear gloss. It is also water-based and, although meant for outdoor items, worked just fine for a desk. The trick was LOTS of coats! I applied EIGHT coats to get the desk surface glassy-glossy and I love the result.
 |
| Oops – accidentally photographed the French side AND it’s blurry. Apologies… |
How to Varnish Stained Wood:
1. Lightly sand any grain that has been raised during the staining process.
2. Wipe thoroughly with a dry cloth
3. Ensure surface is free of debris (wipe with a lint free cloth)
4. Apply varnish using a foam or bristle brush (don’t go cheap – my brush left fuzzies I noticed too late)
5. Allow to thoroughly dry (2-4 hours for this brand).
6. Lightly sand any raised grain, wipe clean (the manufacturer’s suggest sanding the whole thing if more than 24 hours have passed).
7. Re-apply varnish and continue until you can see your reflection (I used 8 coats).
8. Patiently wait for the surface to cure for one week.
UPDATE: Check out this post to see the completed DIY desk with its stunning DIY welded desk legs!!! Here’s a sneak peek:


pretty, pretty.
it looks great! Can't wait to see the entire desk, with lamps 🙂
looks great. Can't wait for the full reveal!
Cannot wait to see the whole thing! Love the glossy finish.
I know, I'm a tease. But this way, my post about the desk won't be 10,000 words long. I got the stainy-varnishy bit out of the way so we can talk about welding and how flippin' awesome the desk is next week. Because it is. Normally I'm all insecure about stuff (esp. my artwork) but the desk is 100% cool.
I love the whitewash stain! My husband is also against painting wood–something I often do. Thanks for sharing!
Ahh! I need the whole tutorial like yesterday. We have to have a desk for our office/guest room done and video turned in by Friday morning. *triple crap*! Looks sooo lovely!
Don't you just love the glossy look. I love it on our coffee table. Looks great.
Sorry, Julia! But I think welding the base like we did would be too much hassle for a Friday deadline (yikes!). Can't wait to see what you come up with.Beatrice – your coffee table remake was lovely!
That is so delicious looking!! I have to tell you that you have far more patience than I do. I have ruined the top of my dresser being premature in fluffing. Good for you for waiting:)
ohmy you are a genuis :*
Oh, wow…you two have done a great job on the desktop. I love the high gloss finish!