If you can’t find the right hardware, try refreshing vintage hard with this tutorial for how to rub ‘n buff hardware – it’s easy!
We had a new furnace installed yesterday and today a giant boom truck is arriving with a propane tank. Our new propane supplier made a poor first impression by offering to dig the 25 foot trench required and then, once our account was created and things were rolling along, reneged. Lovely. Tasked with digging our own 16 inch deep trench, I decided I best look busy on other projects (I hurt my back, so it’s perfectly excusable that I wriggled out of this job). While Hubby worked his magic with a spade, I was ridiculously productive. It’s amazing how much work I can accomplish when I’m avoiding other, even less desirable tasks. Among the many jobs, I finally got my rub ‘n buff on! I’ve been wanting to try this stuff for so long, but it’s not easy to come by here (I had to order it online).
What is Rub ‘n Buff?
Rub ‘n Buff is made from carnauba waxes, metallic powders and pigments. You literally rub it onto a surface until it’s as richly colored as you’d like, and then you buff it to remove excess and create a beautiful sheen. It comes in a little tub, like this, in a variety of metallic finishes:

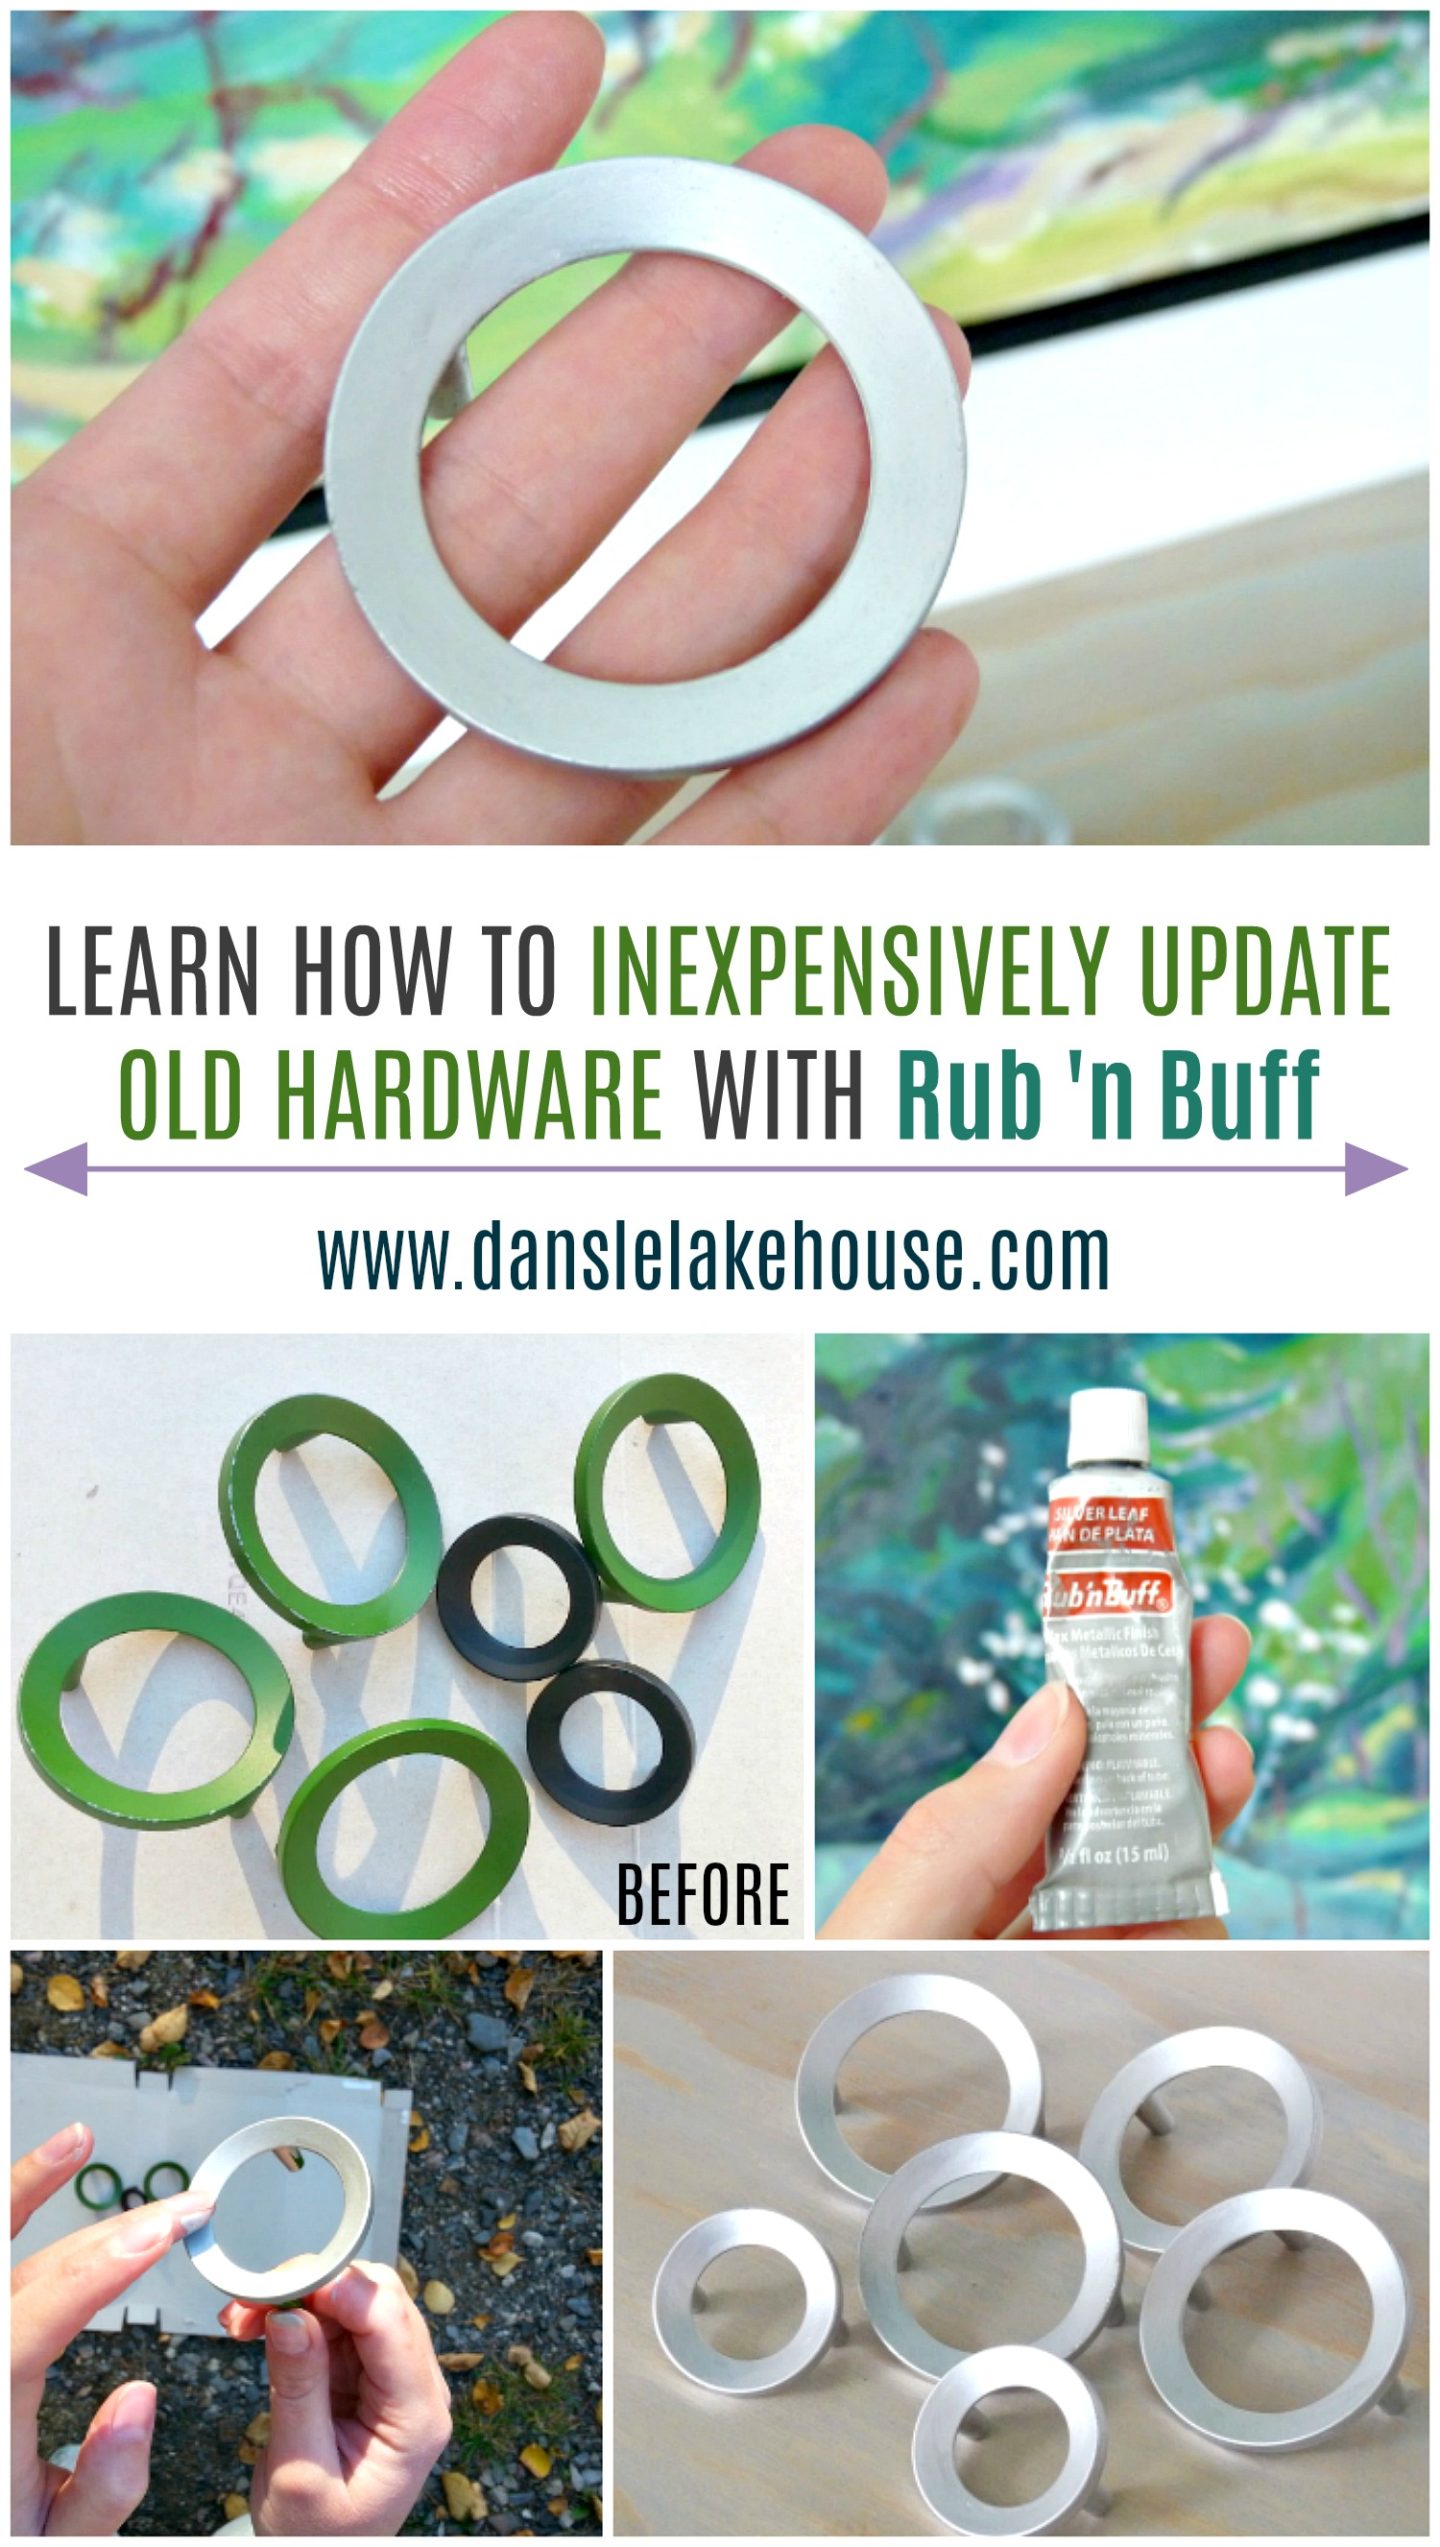
Vintage Hardware – Before:
Hubs and I built some beautiful DIY plywood magazine files and we needed hardware. I couldn’t find anything I liked that wasn’t $15 a knob (agate pulls, I’m looking at you). On a whim, I checked out my local Habitat for Humanity ReStore and found two viable options. I loved the circles but, alas, there were only four and I needed five. A little more rummaging, however, and I produced two smaller circles and decided that I could mix up the sizes. Once I got them home, I realize they were made in Austria (you know I’m such a snob about European-made things), so that made me smile. The colors weren’t right, but not to worry! I was able to rub ‘n buff hardware and give it a fresh and modern look. Here’s the before:

How to Apply Rub ‘n Buff:
I tried the Silver Leaf rub ‘n buff, hoping for a bright brushed silver finish. The rub ‘n buff is strange, strange stuff. It goes on smoothly and a little really does go a long way. It does provide a more natural-looking, less “painted” finish, but wow – is it time consuming! I toiled so long my hand started to cramp up. I applied a small amount with my finger, rubbing it onto the surface. Each time I buffed, I rubbed a little too much off but if I waited too long it dried past the point of buffing. So I found myself rubbing n’ buffing longer than I intended.

How to Apply Rub ‘n Buff on Metal:
I tried using a cloth, a brush, and my fingers (all of these applications are recommended by the manufacturer). I found that using my hands provided the best control, but then I buffed the finish was a soft cloth. If your metal surface is not smooth, you may not want to apply with fingers (you don’t want metal sliver, etc). The only downside to applying rub ‘n buff with my fingers was that it made a total mess – which DID come off with soap and a few skin-dehydrating hand washing sessions. Hubby is constantly harping about donning protective eye wear, buying me a respirator, and wearing gloves – even if the product in question doesn’t have a bony hand on the label. When he caught me doing my best Tin Man impression (just covered in the stuff), he started to ramp up to a safety lecture. He started with, “should you be doing that without gloves? Doesn’t the tube say to wear gloves?”
Haha, NOPE, I informed him, “the tube says to apply with my fingers. Now get back to diggin”.

Rub n Buff vs. Spray Paint:
I think there’s a trade off, when comparing rub ‘n buff to something like spray paint. This rub n’ buff ultimately dries more quickly, but you spend more time working on it – although I’m sure with practice this could be a much quicker process. Spray paint is faster, but sometimes the finish will get messed up even if you’re a spray paint pro. So one major perk with rub ‘n buff vs spray paint is that you can control the finish so you can avoid getting it into the threads, for example, something which can be trickier with spray paint.

Rub ‘n Buff Results on Metal:
In the end, although I’d classify this as super piddly work, it did create a beautiful finish that looks smooth but with the natural texture the metal already had – it lets that peek through. I’ll keep you posted on how durable the finish is. So far, I’d be inclined to use this again on a small makeover like hardware. It seems pretty foolproof.


See the awesome plywood magazine files we built (with aqua interiors!) that showcase this new-to-me hardware by clicking here!


Love the circle pulls! I've been wanting to use that on a project, how coincidental!
Great minds….
I don't want to freak you out about propane, but now that you have it, you need to a combustible gas detector that detects propane in your house to make sure that if you have a leak it is caught right away before it can build up to a dangerous level. I'm sure that since you had a new system installed rather than an old one being retrofitted the risk of this is very low, but it never hurts to be too safe. You can't always count on being able to smell it.
Not freaked out at all! We know. It's another thing to buy on a looooong list of expenses with this process. Thanks for looking out for me, though 🙂
Your pulls look great. I've been using Rub 'n Buff since the late 1960s. I love the stuff.
It was your recommendations over the years that have made me want to try it!! I love hearing that this product has been perfected for so many decades 🙂
It's definitely messy..and I truly believe that using your fingers is the only way to go…but you achieve a unique finish from it that you can't get from anything else. It's not for all projects, but it works really well for some. I keep it on hand in several colors.
Oooo! Love those pulls. Sometimes you can find some interesting vintage stuff and save some cash. Good luck with the new furnace… And supplier (geez, that kinda of thing ticks me off). Fuel is so pricey these days no matter what you use. My sister told us that propane prices really spiked last winter. We have forced air oil and had planned to switch to propane but because of inflated propane prices, the savings isn't worth it. In the next couple of weeks we plan to add a wood stove to supplement. Sigh! Just another woe of Canadian winters.
I forgot to mention the pulls were only $1 a piece! A far cry from even the cheapest ones at any local hardware stores. Oh yes, I heard propane spiked big time last winter (my in laws have it) but even with the increased propane prices and new furnace, we save money. We had electric bills over $800 all winter long! But the real motivator was that our furnace was failing and some days it was 16 degrees inside. I almost became a popsicle last winter. Didn't make sense to put money into it, so we just got a new one and switched to propane at the same time. Hopefully this time next year I can report that it was a fabulous decision, haha. Hopefully my numbers aren't wrong….
Tanya, next time you use the Rub N Buff, try using baby oil to take it off your fingers. I've used that stuff for years and have always hated how it feels on my fingers! (But that IS the best way to apply it.) Baby oil will take it right off.
Thank you, Shawna!! That is an AWESOME tip. I used soap, as recommended, but it really took some vigorous hand washing. I will definitely use baby oil next time. My skin will thank you too.
You're welcome! It works for anything oil-based (paint, stain, etc.).